5 AI Real-World Projects To Set Foot in The Door
Posted on
Don’t just learn Data Science — do it! The best way to do Data science is to build real-world projects that spark your passion and resonate with you.
No matter where you are in your Data science journey, you can always roll up your sleeves, get your hands dirty and experiment with things. This helps you connect the dots and challenge your understanding.
If you are new to the world of AI and LLMs and want to get your feet to the door, I think the following real-world projects (in order of complexity) are good gateways into the field. Even though prompt engineering is such an important aspect when working with (generative) AI models, we will skip it in this article.
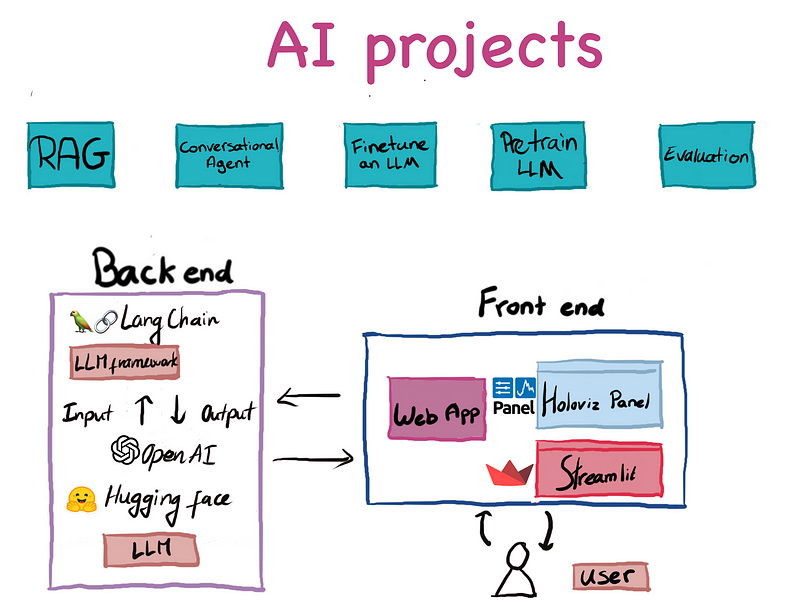
Here is the agenda for today
· What to look for in AI Projects?
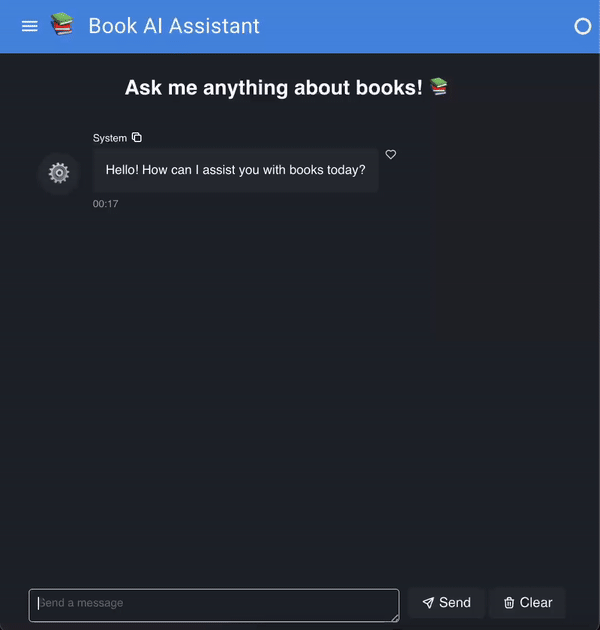
· Project 1: Build a RAG chatbot to ask anything about books! 📚
· Project 2: Build an autonomous Agents: everything-about-book 📚
· Project 3: Train your own LLM (a song writer 🎶🎸🎹)
· Project 4: Fine-tune a Bert model to understand legal texts 👩⚖️
· Project 5: Model Evaluation
What to look for in AI Projects?
The term “artificial intelligence” was firstly used as early as the 1800s, though its occurrences were relatively minuscule.
Some ideas surrounding artificial intelligence already existed in the 19th century. In 1872, Samual Butler published Erewhon, which contains a story about a fictional land where machines evolved according to Darwin’s theory of evolution, but at a much higher pace and obtained consciousness and surpassed humans in every aspect. Very fictional 150 years ago, but today it’s not entirely unimaginable.

The 1940–1960s period was a golden era for AI discovery. Even though the landscape changed very quickly in the last decade with huge amount data and computing power, Artificial Intelligence has been around for quite a while.
The term Artificial Intelligence as how we often use it today was officially coined in the Dartmouth AI Workshop in 1956**.** These day, when you people talk about AI, they often refer to Generative AI, which is a subset of Machine Learning and Deep Learning.
When exploring AI projects, in my opinion, we would want to prioritise those that offer:
- Theoretical fundamentals and AI Concepts: Grasp the fundamental theories, principles and core concepts in the field of AI.
- Development of AI products: Get hands-on experience by applying frameworks and building practical applications. This helps to validate your understanding and improve your technical skills
- Evaluation: Learn how to assess and refine the performance of your AI applications.
Project 1: Build a RAG system to ask anything about books! 📚
Imagine you have a whole database about books (📚) and you want to retrieve the relevant books given your question and answer the question about certain books, this is a perfect use case to create a document retrieval app using RAG.
>» What will you create?
We will create a RAG system that, given a user query, returns the relevant books from our database and answer any questions about books! 📚📚📚
>» Skills you will learn
- RAG system
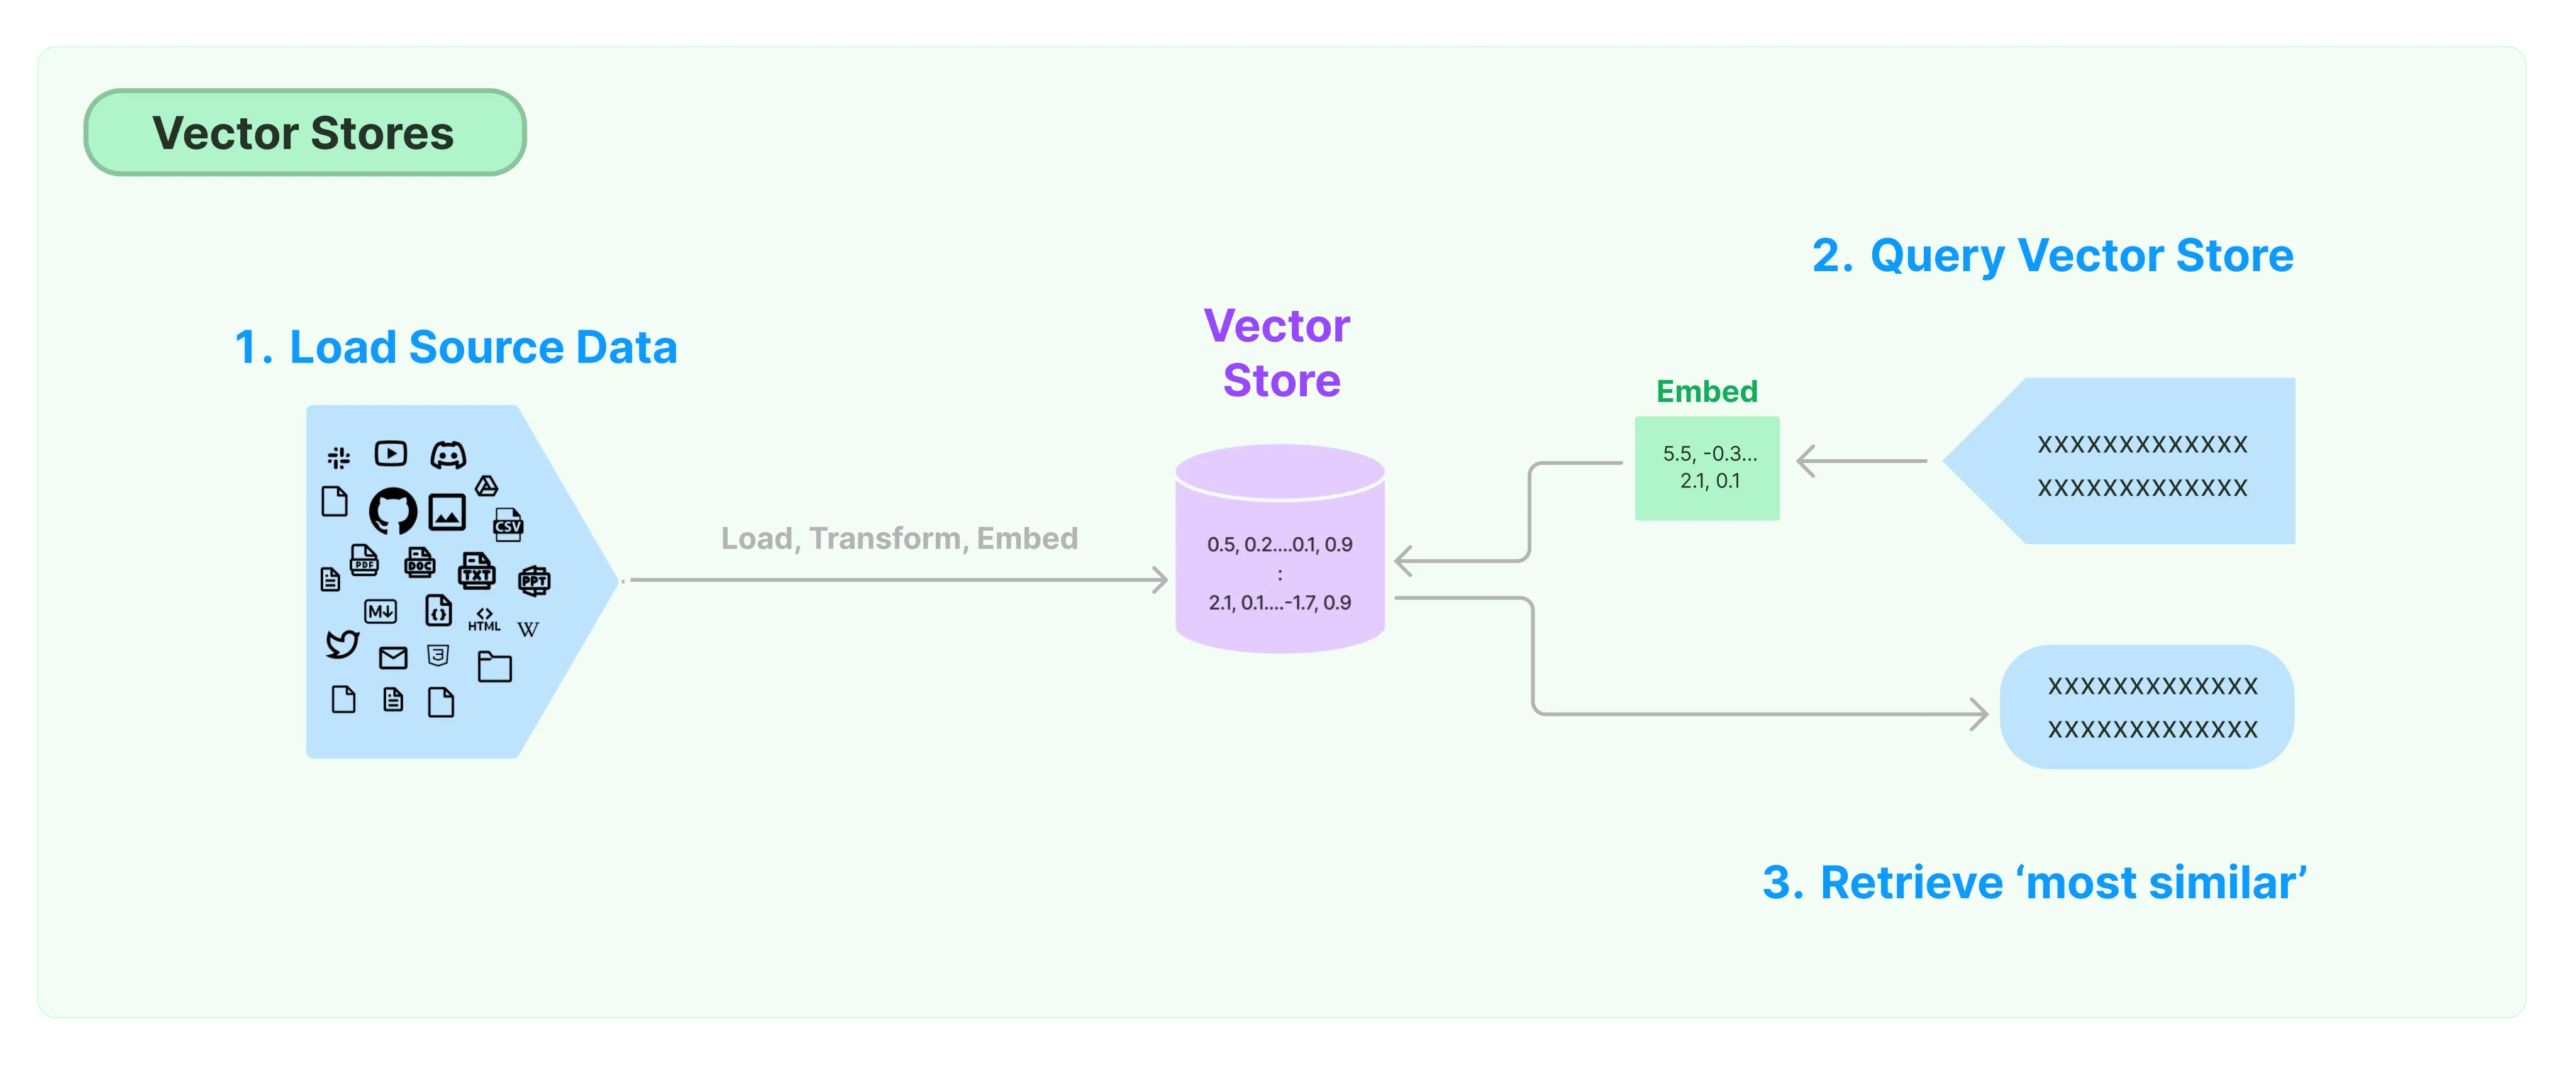
- Create vector embeddings
- Store and query embeddings using a vector stores/databases (e.g., FAISS, Qdrant, Chroma)
- Combine vector stores and LLM for information retrieval
>» Fundamental theories and concepts
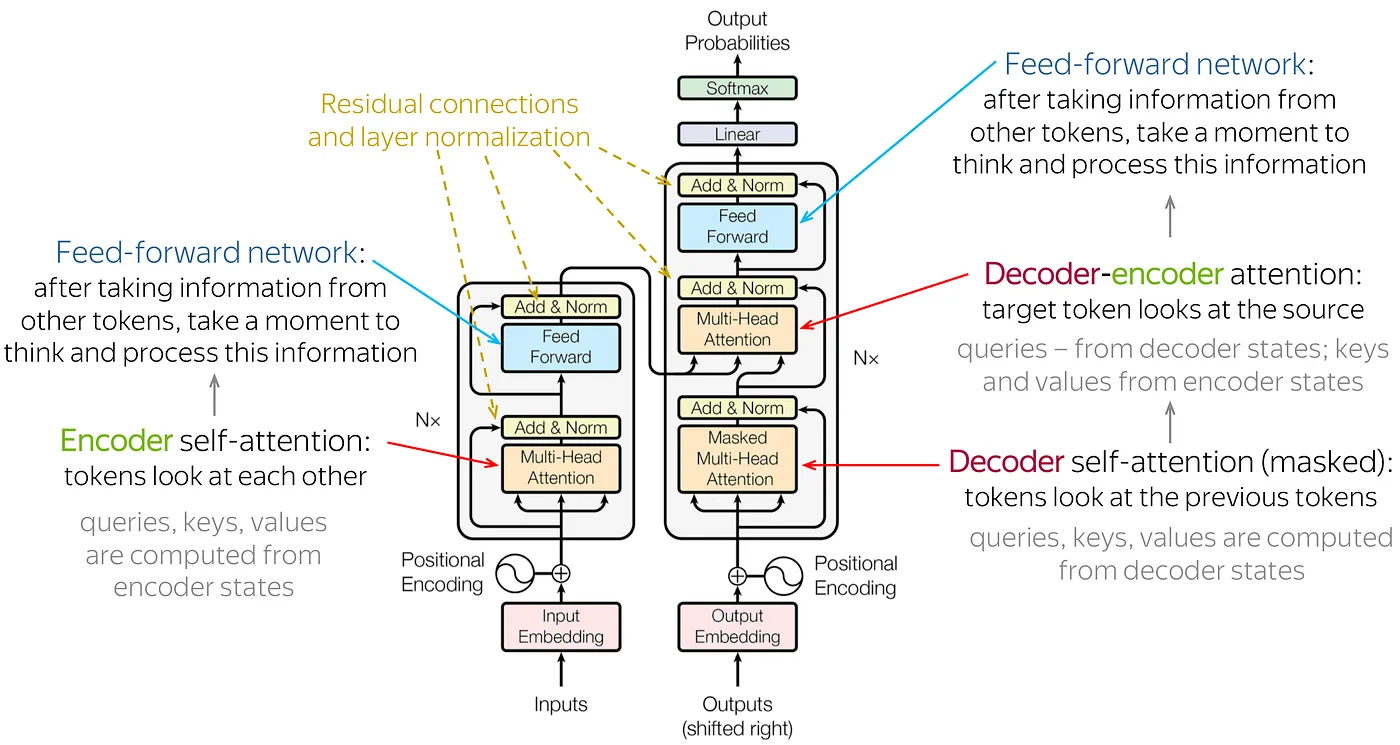
👉 What is Retrieval Augmented Generation (RAG) system?
A RAG-based architecture provides an LLM (i.e Claude3.5) with access to external sources of knowledge that provide additional context to the user query. This typically involves searching by similarity to the query, retrieving the most relevant documents, and inserting them into the prompt as context for information retrieval.
RAG is used to solve hallucinations in open-ended scenarios, like a user talking to a chatbot that is prone to making things up when asked about something not in its training data.
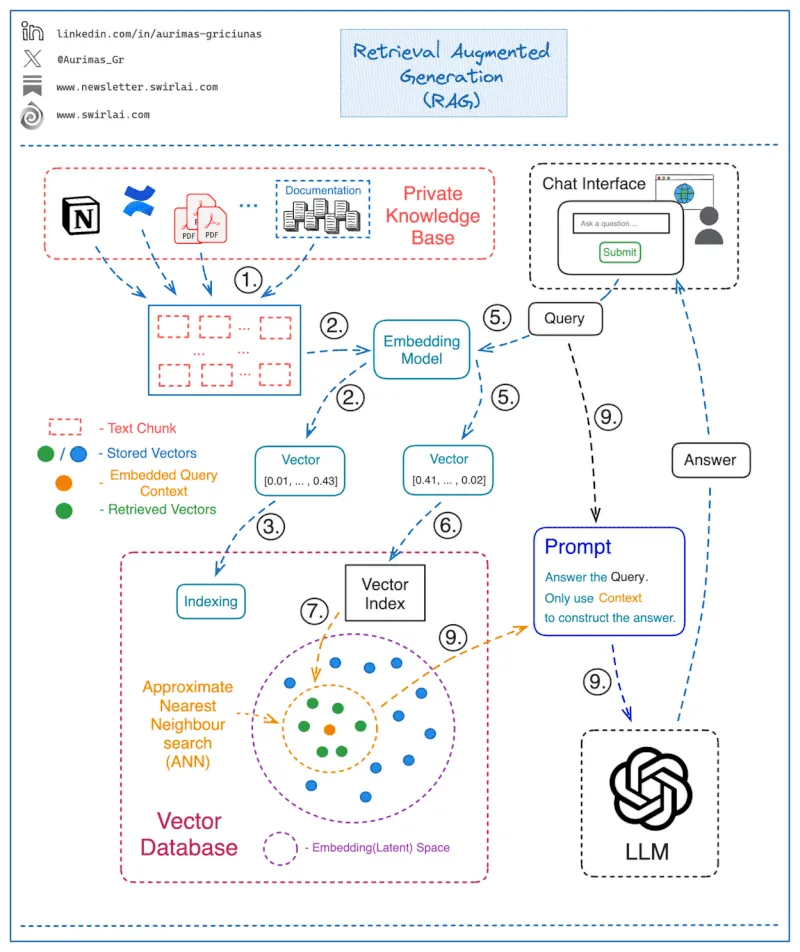
Here’s how the process works for RAG:
- Break the document into Chunks
- Turn each chunks into vector embedding and index the chunks in a vector database
- Query: given user input, vectorize user input, search by vector for closest records in the vector database and retrieve relevant context
- Generate: Combine query and relevant context, get LLM response
👉 Embeddings and vector stores/databases
Although embedding models have been available long before the advent of generative AI. Generative AI models have given rise again to the vector representation of text, or _word embeddings, which is a fancy way of saying that text or images can be presented as a list of number. F_or example, you might think of as coordinates for a location.
You can compute Paris — France + Netherlands, and the result is the vector embedding close Amsterdam, which seems to show that the notion of capital city was encoded in the embeddings.
Here is another famous example: if you compute King — Man + Woman (adding and subtracting the embedding vectors of these words), then the result will be very close to the embedding of the word Queen. It seems like the embeddings encode the concept of gender!
When you ask ChatGPT a question, under the hood your question will be converted into an embedding/vector that ChatGPT can understand. That embedding is indexed and stored in a vector database. A vector database stores the text records with their vector representation as the key. This technology helps reduce hallucinations by referencing relevant context ChatGPT isn’t trained on in the prompts, so that it can use this context in calculating the response.
>» Implementation Steps
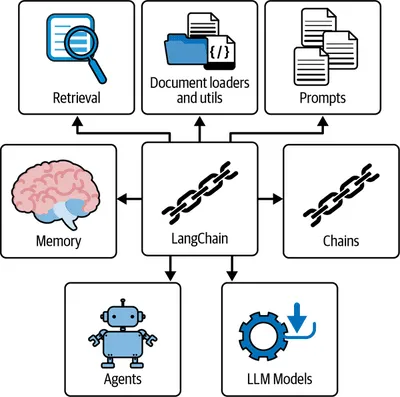
Techstack:
- LLM Framework: Langchain. It provides you lots of components to work with LLMs
- Foundation model: GPT4o
- Vector storage: Qdrant (you can use Chroma or FAISS)
- Front-end: Holoviz Panel (alternative could be Streamlit)
- Embedding model: OpenAI text-embedding-large-03
👉 Step 1: Set up the Environment
First, ensure you have the necessary libraries installed:
uv pip install –upgrade langchain openai qdrant-client pandas nltk tomotopy pyvis
👉 Step 2: Scrape book data
Function details omitted for brevity, please see in this repo:
def scrape_book():
""""""
# (Function implementation details omitted for brevity)
# This function would include scraping from google book using google API
# and reviews from amazon using Selinium
return df_books
👉 Step 2: Setting up the vector database
First we need to create the embeddings object and set up a vector database to store the embedding of our book data. I will be using OpenAI text-embedding-3-large for generating embeddings.
embeddings = OpenAIEmbeddings(model=“text-embedding-3-large”)
def create_db(documents):
return Qdrant.from_documents(
documents=documents,
embedding=embeddings,
collection_name=“my_documents”,
location=":memory:",
force_recreate=False,
)
db = create_db(documents)
When setting up the vector database, we pass location=”:memory:” to specify that the database should be created in memory and that we plan to interact with it in the same session.
👉 Step 3: Information retrieval using relevant context
Next, we take a user query, search the database and return a list of relevant documents. Here, there are some parameters you can tweak, for example the search space (k numbers of documents to return) or similarity type ( similarity_score_threshold, maximum marginal relevance mmr):
retriever = db.as_retriever(
search_type=“mmr”, search_kwargs={“k”: 2, “lambda_mult”: 0.25}
)
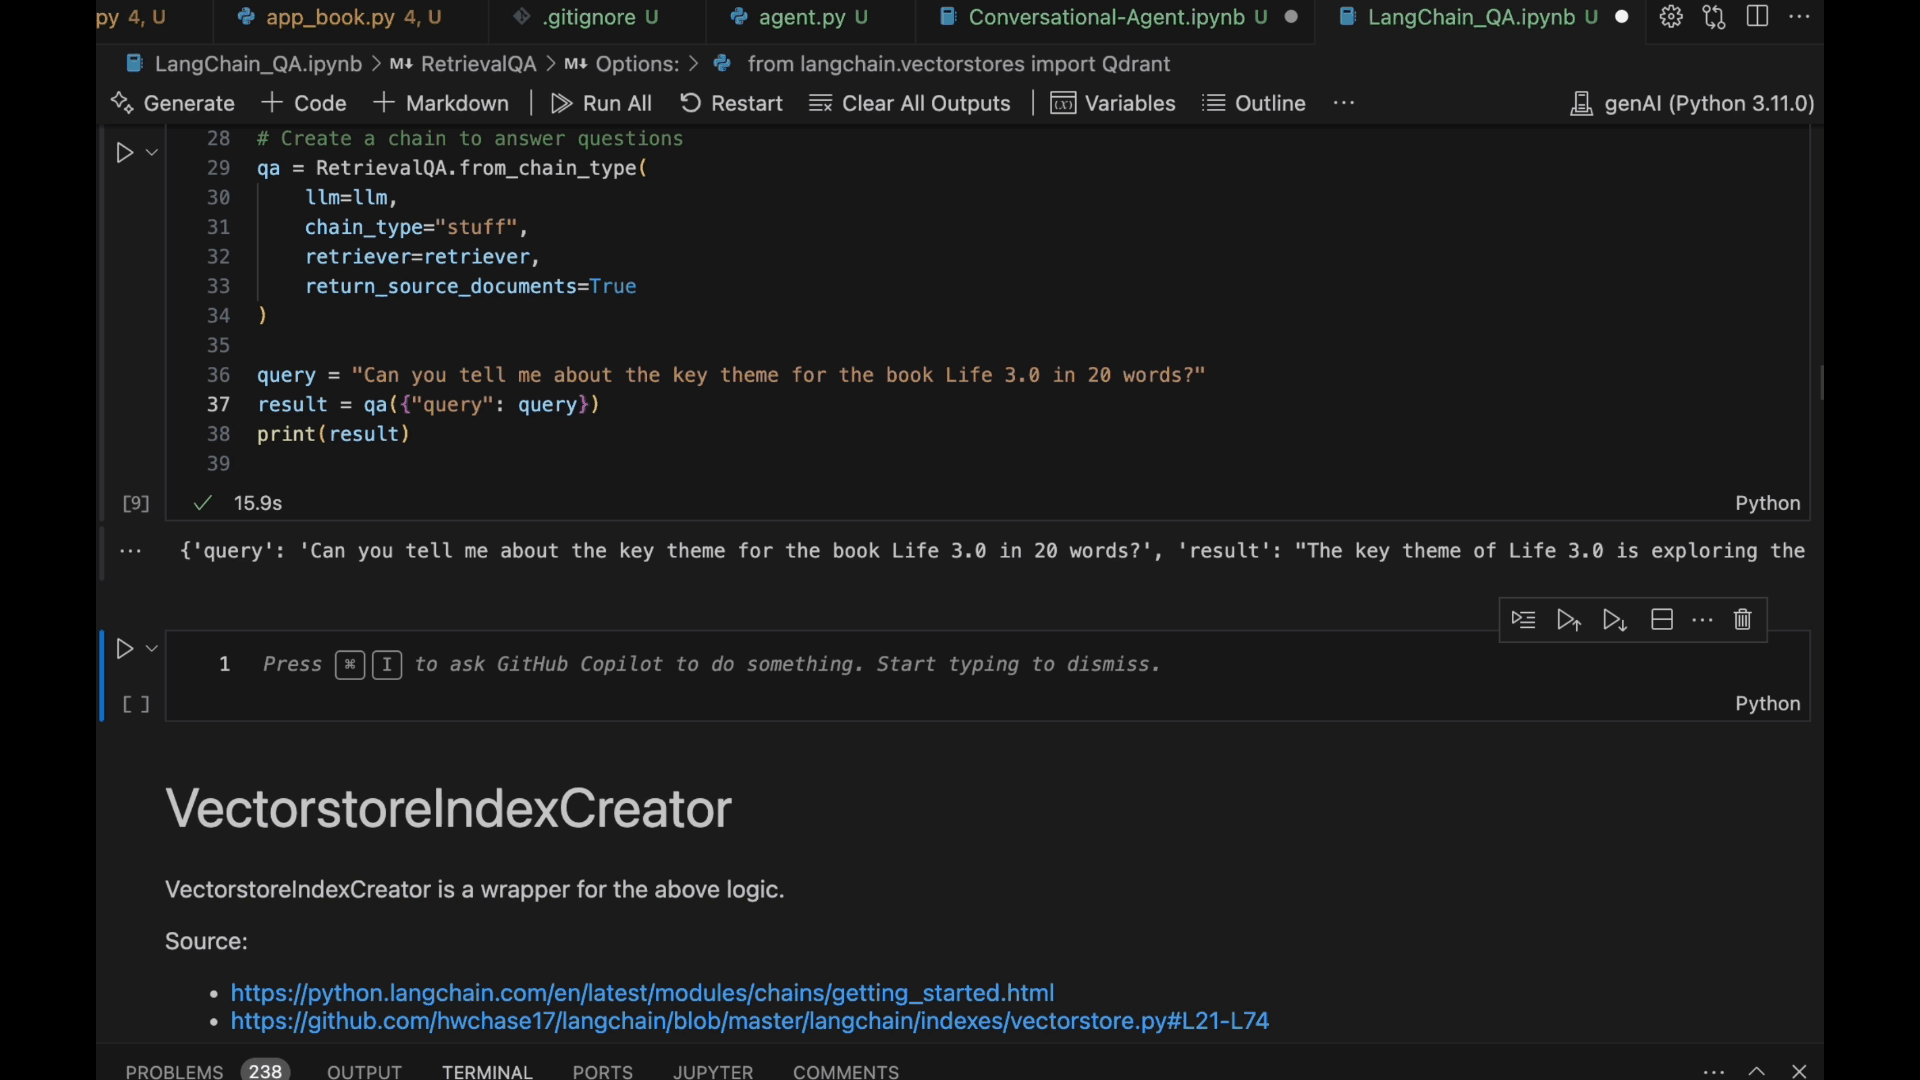
# Create a chain to answer questions
qa = RetrievalQA.from_chain_type(
llm=llm,
chain_type=“stuff”,
retriever=retriever,
return_source_documents=True
)
query = “Can you tell me about the key theme for the book Life 3.0 in 20 words?”
result = qa({“query”: query})
And there is that! A system that searches by similarity to the query, retrieving the most relevant documents and use that as context for answering user question:
>» Useful Resources
- 📚 Prompt engineering for Generative AI (James Phoenix and Mike Taylor)
- 📚 AI Engineering (chip Huyen)
Project 2: Build an autonomous Agents: everything-about-book 📚
Generative AI models have given rise to agent-based architecture. If you want to understand how agents works and build one from scratch, I have an article on that.
>» What will you create?
Before foundation models, only organizations with sufficient resources to develop AI models could develop AI applications. With foundation models, anyone can build AI applications.
In this project, we will create an enhanced version of the RAG system in Project 1 that can autonomously decide and take actions without any human intervention. Exciting!
>» Skills you will learn
- Agent architectures
- Build a custom agent with OpenAI function calling & Langchain LCEL
- Creating interactive user interfaces with Holoviz Panel
>» Fundamental theories and concepts
👉 What is an agent? 🤖
Agent is an autonomous entity that, given high-level instructions can plan, use actions/tools, and perform multiple iterative steps to achieve a desired goal.
Agents can take various actions such as executing a Python function; Then, the agent will observe what happens as the result of executing an action and decide which action to take next. This process is then repeated until the agent has the final answer to the main task.
You can also see this process written out in the following pseudocode:
next_action = agent.get_action(…)
while next_action != AgentFinish:
observation = run(next_action)
next_action = agent.get_action(…, next_action, observation)
return next_action
An agent has the following components such as inputs, desired goals and available actions. Consider a self-driving car which receives inputs such as sensor data (cameras or ultrasonic). The goal is to ensure safe, efficient navigation. The reward function could be miles driven without intervention (Tesla). The available actions can be accelerate, decelerate, turn, change lanes, stop etc…
There are many agent frameworks that aim to improve LLM responses. The original framework was ReAct, allowing an LLM to create observations after taking actions via tools. These observations are then turned into thoughts about what would be the right tool to use within the next step until a final answer is reached.
OpenAI released more fine-tuned LLMs tailored toward function calling. It offers an alternative against the standard ReAct pattern for tool use.
>» Implementation Steps
For this project, we will be using OpenAI function calling and Langchain LCEL to build the Agent.
An agent work with tools/actions that are available to it, so the first step would be to define the tools.
👉 Step 1: Define Tools
A tool is simply a predefined function that allows the agent to take a specific action.
As LLMs such as GPT-4 normally only generate text/image, we can provide tools that can perform other actions such as interacting with a database or just executing python code.
We will start by defining four main tools that our agent will use. For brevity, function implementation details are omitted here:
scrape_books: Scrape books and book reviews from google and amazonfind_relevant_books: Retrieves relevant books based on a user query.create_topic_network: Creates a visualization of topics in the books.qa: Answers user’s questions based on retrieved documents
These tools are defined as functions and decorated with the @tool decorator from LangChain, for example:
@tool
def find_relevant_books(user_query):
"""
Return all relevant books based on user query.
Important: This function should be called only for queries that require finding specific books.
For general queries that do not require finding specific books, use other available functions.
"""
retriever = db.as_retriever(
search_type=“mmr”, search_kwargs={“k”: 4, “lambda_mult”: 0.25}
)
relevant_docs = retriever.get_relevant_documents(user_query)
session_state[“relevant_docs”] = relevant_docs
session_state[“retriever”] = retriever
return relevant_docs
llm = ChatOpenAI(
model=“gpt-4o”,
temperature=0,
openai_api_key=os.getenv(“OPEN_AI_KEY”)
)
@tool
def qa(user_query):
"""
Answer user questions based on the retrieved documents
"""
retriever = session_state[“retriever”]
relevant_docs = session_state.get(“relevant_docs”)
if relevant_docs is None:
# If no documents are stored, retrieve them
relevant_docs = retriever.get_relevant_documents(user_query)
session_state[“relevant_docs”] = relevant_docs
\# Create a chain to answer questions using stored documents
qa = ConversationalRetrievalChain.from\_llm(llm, retriever)
chat\_history = \[\]
result = qa(
    {"question": user\_query, "chat\_history": chat\_history, "context": relevant\_docs}
)
return result
When decorating these actions using @tool , the main agent will have access to a list of functions, their arguments and docstrings. This enables the agent to smartly choose the most relevant tool for the task.
For convenience, we will store the relevant documents and the retriever in a globally defined dictionary session_state . This makes it easier for the agent to access this information.
👉 Step 2. Create the prompt
Now we set up the prompt with a system message, user message, and a MessagesPlaceholderthat allows the agent to store its intermediate steps:
from langchain.prompts import ChatPromptTemplate, MessagesPlaceholder
# Define the prompt template
prompt_template = """
You are a helpful AI assistant specializing in answering questions
related to books from users. Use retrieved relevant books to
answer questions.
====================
{relevant_docs}
"""
prompt = ChatPromptTemplate.from_messages(
[
(
“system”,
“““You are helpful AI assistant. Use the following
template for your actions and observations.”””
),
(“user”, prompt_template),
MessagesPlaceholder(variable_name=“chat_history”),
(“user”, “{input}”),
MessagesPlaceholder(variable_name=“agent_scratchpad”),
]
)
The scratchpad is where the agent will store all the intermediate results. For example, if the user asks to create a visualization of all the topics for the first Harry Potter book, the agent will first find the relevant book (the philosopher’s stone), store the output in the scratchpad, then reason that it should call create_topic_network next.
👉 Step 3. Initialize the agent
For the agent to know all the available tools, you will need to first bind the tools directly to the LLM for function calling:
from langchain.agents.format_scratchpad import format_to_openai_functions
from langchain.tools import Tool
# These are custom functions for finding books, answering questions, and creating topic networks.
tools = [find_relevant_books, qa, create_topic_network]
# OpenAI Function Formatting. This converts the tools into a format compatible with OpenAI’s function calling feature.
functions = [format_tool_to_openai_function(f) for f in tools]
#This sets up the GPT-4o model with the defined functions.
model = ChatOpenAI(
openai_api_key=openai.api_key,
temperature=0,
model_name=“gpt-4o”,
).bind(functions=functions)
Now that we have our tools and prompt defined, we can create the agent:
from langchain.agents import AgentExecutor
from langchain.agents.output_parsers import OpenAIFunctionsAgentOutputParser
from langchain.schema.runnable import RunnablePassthrough
from langchain.memory import ConversationBufferMemory
# Set up the agent chain.
# including assigning relevant documents and agent scratchpad, applying the prompt, running the model, and parsing the output.
agent_chain = (
RunnablePassthrough.assign(
agent_scratchpad=lambda x: format_to_openai_functions(x[“intermediate_steps”]),
relevant_docs=lambda x: “\n”.join(
str(doc) for doc in session_state.get(“relevant_docs”, [])
),
)
| prompt
| model
| OpenAIFunctionsAgentOutputParser()
)
# Set up a memory component to store conversation history.
memory = ConversationBufferMemory(
return_messages=True,
memory_key=“chat_history”,
input_key=“input”,
output_key=“output”,
)
# Initialize an agent with the agent and defined tools
# This combines all components into an executable agent that can process queries and maintain conversation context.
# With AgentExecutor, the agent is equipped with the tools and verbose output is enabled, allowing for detailed logging.
agent = AgentExecutor(agent=agent_chain, tools=tools, verbose=True, memory=memory)
And there is that! A fully functional agent with access to a few tools, ready to get to work.
👉 Step 4. Creating the User Interface with Panel
Now that we have our agent set up, let’s create a user-friendly interface using Panel to interact with this agent:
>» Useful Resources
- ⏩ AI Agents in LangGraph course
- ⏩ Multi AI Agent Systems course
- 📚 Deep learning book (Ian Goodfellow and Yoshua Bengio and Aaron Courville)
- 📚 Prompt engineering for Generative AI ( James Phoenix and Mike Taylor)
Project 3: Train your own LLM (a song writer 🎶🎸🎹)
If you are concerned with the theoretical fundamentals of AI and want to get a high-level understanding of how these foundation models are trained, building a LLM from scratch would challenge your understanding.
If you are new to the transformer-based language model, you are in luck because it is super simple with nanoGPT. In the video Let’s build GPT: from scratch Andrej Kapathy walks through the process of constructing a baby GPT model, or nanoGPT, from the ground up and explains what is going on under the hood and what is at the core of chatGPT. The code to build a babyGPT model based on Shakespeare’s text is provided in this repository.
>» What will you create?
Do you love music? Why not building a LLM that can generate song in the style that you want?
Because I love Ed Sheeran, in this project, we will create a small word-based transformer model that write songs in Ed Sheeran’s style! 🎶🎸🎹
>» Skills you will learn
- What it means to “train” a language model froms cratch with Pytorch
- Basics of neural networks: forward, backward, propagation, activation functions, gradient descent algorithm, how weights are updated
- Some important NLP concepts such as tokenization
- Important hyper-parameters: n_layer, n_head, n_embd, learning_rate, max_iters , lr_decay_iters
>» Fundamental theories and concepts
Compared to the rest of the article, this section is math-heavy. If you find it confusing, feel free to skip the math.
👉 Basics of neural network
The architecture of artificial neural network has input signal and an output signal and it will simply activate the output when the input is activated.

Each input in a neural network is associated with a weight. First, the neural network takes the weighted sum of all of the input values.
Forward propagation
In the hidden layer, the activation function, which takes into account the input and weight of each input, is applied in each neuron and produces an output which is used as input for the next layer.
An activation function is a function that helps the neural network learn patterns in the data and passes the output of the previous layer into input for next hidden layers. The process continues until we get the output of the final layer in a neural network, which is the predicted value .
Back-propagation process
Now, we have an output and the network is going to start the back-propagation process. It is all about the so-called loss function. In essence, a loss function is a function that compares the predicted output and the actual output of the network and returns the error information (differences between y and ŷ).
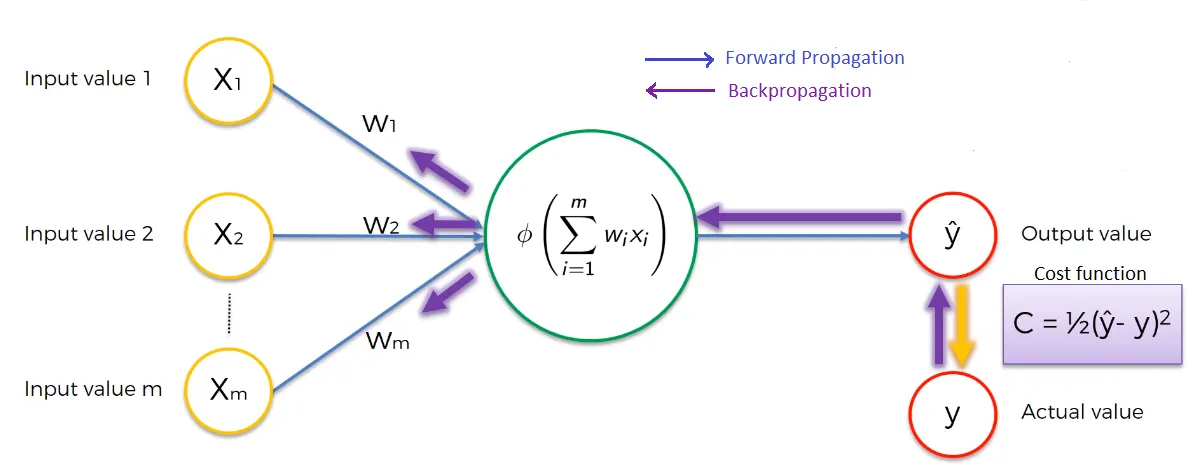
For each training instance the back-propagation measures how each weight in the network contributes to the overall error. This allows the model to update the weights using optimization algorithm, which tweaks all the weights in the network until when the loss function is minimized.
Among optimization algorithms, Gradient-Descent-based is most widely used algorithm**.** To understand how exactly the weights are adjusted using Gradient Descent, a detailed explanation can be found here. You can also gain some insights for alternatives of Gradient Descent in this post.
Back in the days, Recurrent Neural Networks (RNNs) and Convolutional Neural Networks (CNNs) were popular neural network architectures for deep learning with images (CNNs) and texts (RNNs). However, in 2017, the landmark paper “Attention is all you need” which introduces the transformer architecture has changed the world of AI forever as it is the architecture behind LLMs these days, including ChatGPT.
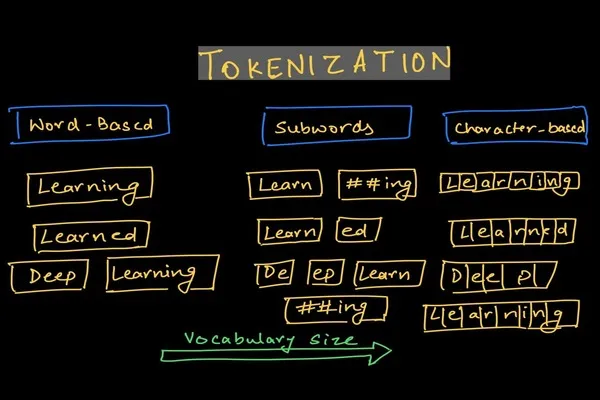
👉 Tokenization
Tokens are the building blocks of Language Models. Tokenization is a way of separating a piece of text into smaller chunks called tokens. So you can think of tokens as pieces of words. The process of breaking the original text into tokens is called tokenization. For OpenAI GPT models, an average token is roughly ¾ the length of a word so 1,000 tokens is about 750 words.. Depending on the tokenizer you use, tokens can be either words, characters, or subwords.
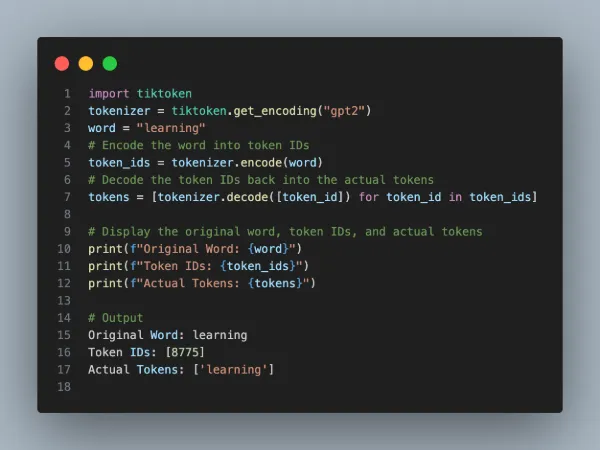
The tiktoken library is a common library for tokenizing text, particularly when working with models like OpenAI’s GPT-3 or GPT-4. Below is an example of how to use tiktoken to turn a word into tokens:
>» Implementation Steps
Alright, enough talking, let’s get our hands dirty. We are training a small word-based transformer model that predicts which term will come next.
👉 Step 1. Prepare the training data
Load dataset
For this article, we will be using the Ed-sheeran data set that contains the lyrics to all the songs by Ed Sheeran. You can load this dataset with the datasets library:
from datasets import load_dataset
dataset = load_dataset(“huggingartists/ed-sheeran”)
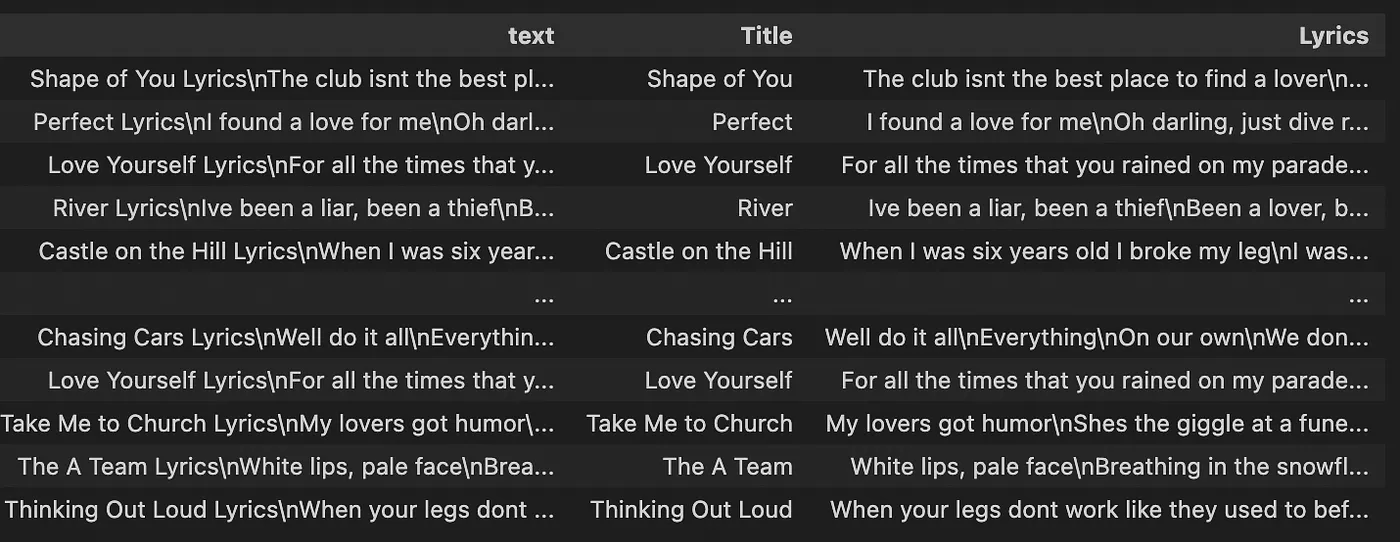
Awesome! We are now ready to do some data processing to get the lyrics from each song in the data set. The following block of code will process and data into a csv file:
import pandas as pd
df = pd.DataFrame(data=dataset)
df[’text’] = df.train.apply(lambda row: row.get(“text”))
def get_title_lyrics(text):
lyrics_start = “Lyrics”
lyrics_index = text.index(lyrics_start)
title = text[:lyrics_index].strip()
lyrics = text[lyrics_index + len(lyrics_start):].strip()
return {‘Title’: title, ‘Lyrics’: lyrics}
df[[‘Title’, ‘Lyrics’]] = df[’text’].apply(get_title_lyrics).apply(pd.Series)
Encoding the text and create train/test/validation set
Since language model works with tokens, we will converts the raw lyrics into a sequence of integers, or token-ids. Because we are going to train a word-level transformer model, we will encode each token, which is represented by a unique token id (integer) using GPT2 tokenizer.
Let’s select 90% of the text as training data and 10% for validation.
The encoded text is split into a training set (train_ids) and a validation set (val_ids). These training and validation sets contain sequences of integers that correspond to the tokens in the original text:
import os
import tiktoken
import numpy as np
import pandas as pd
df = pd.read_csv(“data/ed-sheeran/ed_sheeran.csv”)
data = df[“Lyrics”].str.cat(sep="\n")
n = len(data)
train_data = data[: int(n * 0.9)]
val_data = data[int(n * 0.9) :]
# encode with tiktoken gpt2 bpe
enc = tiktoken.get_encoding(“gpt2”)
train_ids = enc.encode_ordinary(train_data)
val_ids = enc.encode_ordinary(val_data)
# export to bin files
train_ids = np.array(train_ids, dtype=np.uint16)
val_ids = np.array(val_ids, dtype=np.uint16)
train_ids.tofile(os.path.join(os.path.dirname(__file__), “train.bin”))
val_ids.tofile(os.path.join(os.path.dirname(__file__), “val.bin”))
# train has 433,585 tokens
# val has 48,662 tokens
Now, I will save the above code in a file called prepare-edsheeran.py and run the following command:
python data/prepare-edsheeran.py
What this does is that it will save the train_ids and val_ids sequences as binary files - train.bin and val.bin which holds the GPT2 token ids in one sequence. And that’s it! The data is ready. We can kick off the training.
👉 Step 2. Define the model
Code implementation details omitted for brevity. The following process encapsulates the essential steps for creating the model and training (code can be seen in this repository).
Create model.py with GPT class definition:
- Initialize transformer components (embeddings, blocks etc)
- Define forward pass: process input through embeddings and transformer blocks
- Configure optimizer: separate parameters for weight decay
- For each epoch and batch, perform forward pass, calculate loss and back-propagate and update parameters
Then, we will create train.py to initialize model, run training loop and generate texts.
👉 Step 3. Train the babyGPT model
In this section, we will actually train a baby GPT model. Let’s create a new file called config/train_edsheeran.py to define the hyper-parameters:
out_dir = “out-lyrics”
eval_interval = 250 # keep frequent because we’ll overfit
eval_iters = 20
log_interval = 10 # don’t print too often
# we expect to overfit on this small dataset, so only save when val improves
always_save_checkpoint = False
dataset = “ed-sheeran”
batch_size = 12 # 12 samples per iteration
block_size = 64 # context size
# a baby GPT model :)
n_layer = 6
n_head = 6
n_embd = 384 # each embedding vector for each token will have 384 dimensions
dropout = 0.2
learning_rate = 1e-3 # with baby networks can afford to go a bit higher
max_iters = 2000
lr_decay_iters = 2000 # make equal to max_iters usually
min_lr = 1e-4 # learning_rate / 10 usually
beta2 = 0.99 # make a bit bigger because number of tokens per iter is small
warmup_iters = 100 # not super necessary potentially
To train the model, in your terminal, run the following code:
python train.py config/train_edsheeran.py
and training starts…!
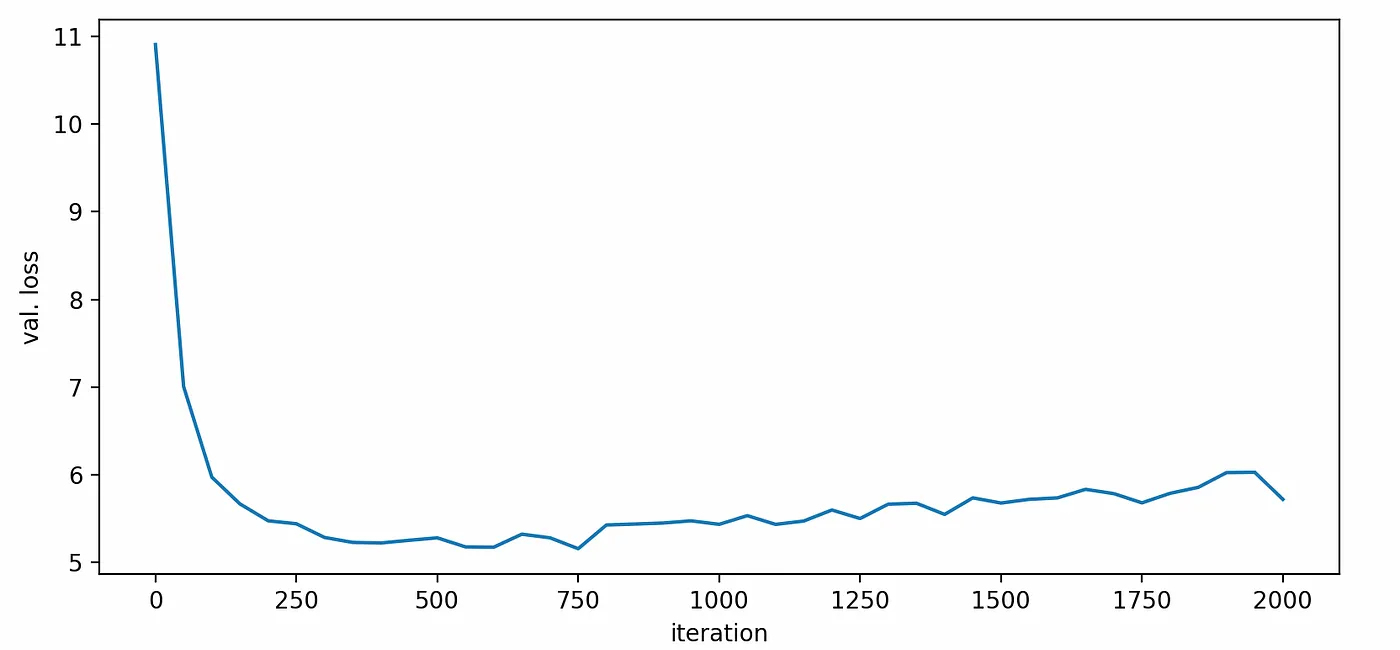
***Waiting****
Voila! Training is done. We will create a plot displaying the loss on the validation set as a function of the number of iterations. Observing the following plot, we notice an increase in the validation loss after 500 iterations, suggesting the presence of overfitting.
To address this issue, we will limit our selection to these 500 iterations and proceed with retraining the model. Once the retraining finishes, the trained model ckpt.pt will be saved to output directly out-lyrics
Step 4. Generate songs in Ed Sheeran style
Now is the fun part! Let’s see how well our model can learn to craft songs that sound like Ed Sheeran! We can sample from the best model by pointing the sampling script at this directory:
python sample.py –out_dir=out-lyrics
Running the above code generates a few samples. Here is the result:
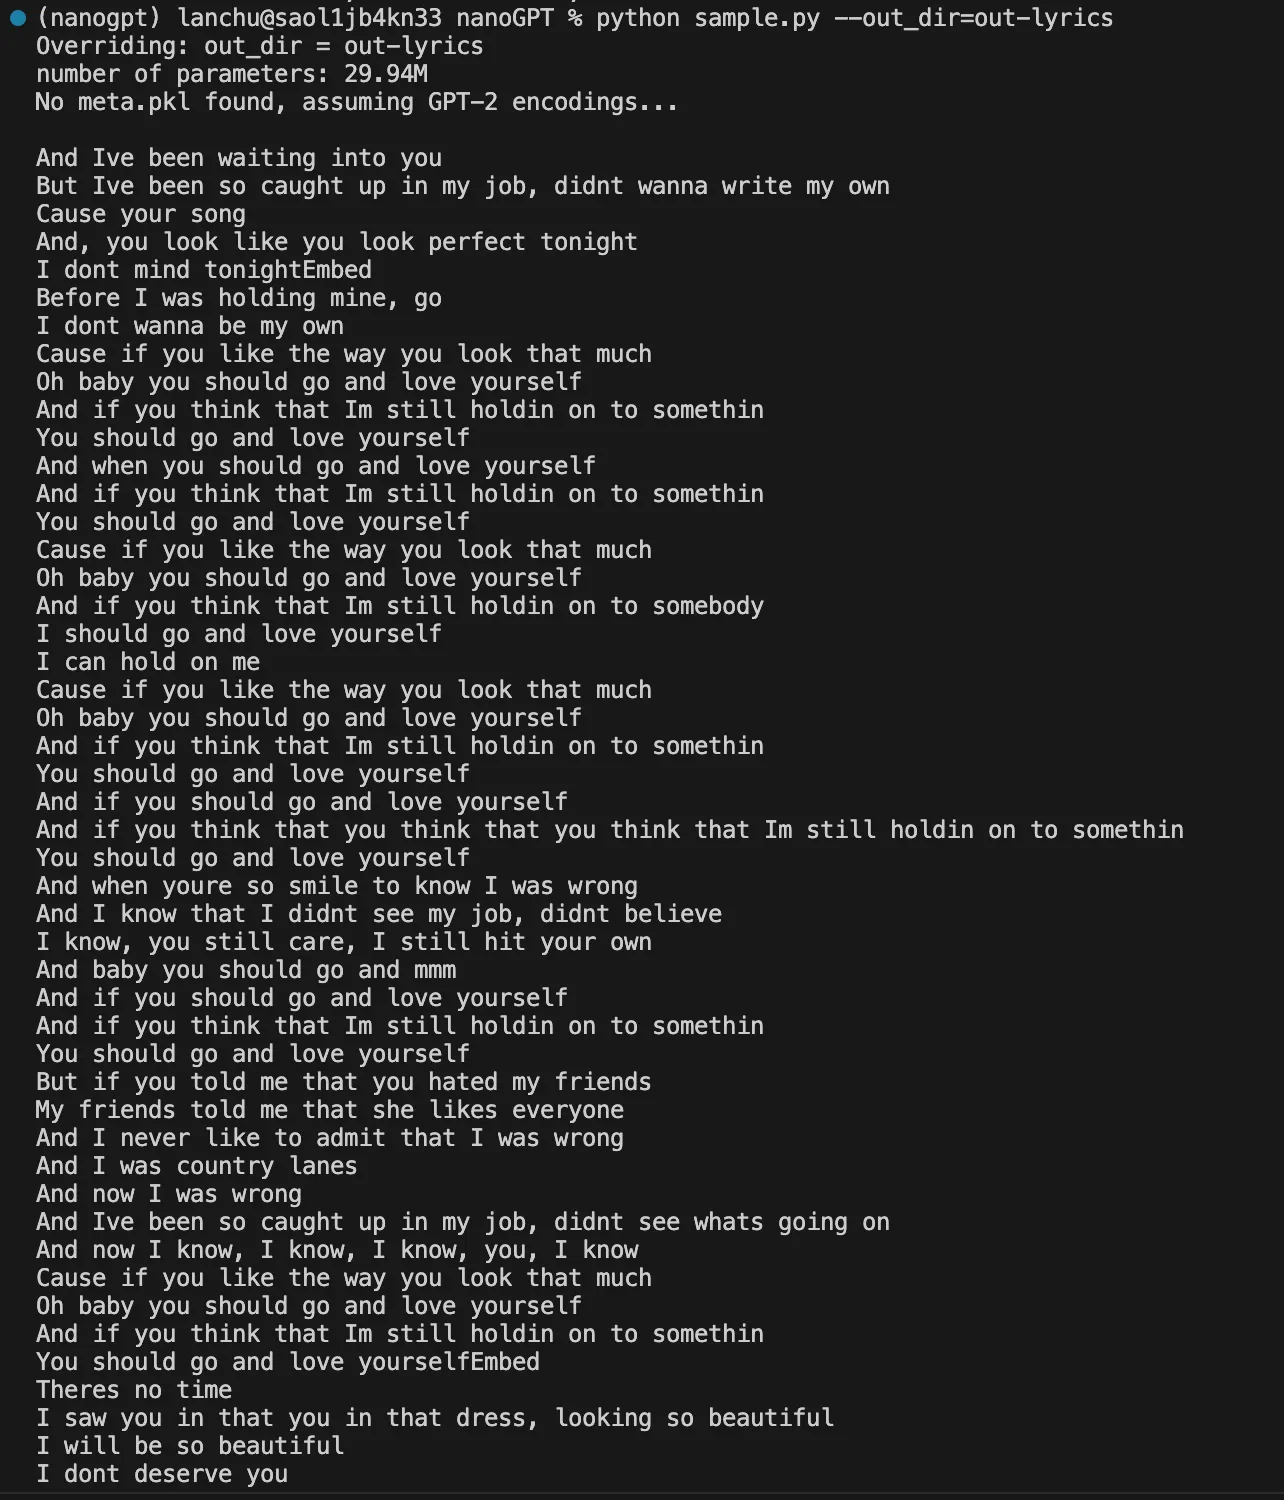
I think it does sound like Ed Sheeran with cheesy love songs and romantic themes, does not it? 🎶🎸🎹
>» Resources
- 📹 Introduction to LLM
- 📹 3Blue1Brown Neural Network playlist
- 💬 Let’s Build GPT from scratch (Andrej Karpathy)
Project 4: Fine-tune a Bert model to understand legal texts 👩⚖️
Would it be so awesome if you can use state-of-the-art models without having to train one from scratch for your own specific task? Fine-tuning is an incredibly powerful training technique for this!
>» What will you create?
We will create a specialized domain Bert-based model for a semantic role-labelling task using legal texts! 🤗 Transformers provides access to thousands of pretrained models for a wide range of tasks.
>» Skills you will learnt
- Fine-tune a pretrained model with Transformers Trainer framework
- Work with Dataset object from Transformers
>» Fundamental theories
👉 What is Finetuning?
Finetuning a model means continuing to train a previously trained model using a dataset specific to your task. Because of that, the model weights are obtained from the previous training process. For example, if you feed your childhood journal entries into ChatGPT and continue to train it, it is finetuning.
>» Implementation Steps
(Code adapted from Hugging face)
👉 Step 1. Load a dataset object and split into train/test/validation:
Obviously, this requires having a labelled dataset.
Load the dataset for finetuning
data = “data/all_annotations_cleaned.csv”
df_to_train = pd.read_csv(data, sep = “;”, converters={’tokens’: eval, ‘srl_tags’: eval})
dataset = Dataset.from_pandas(df_to_train)
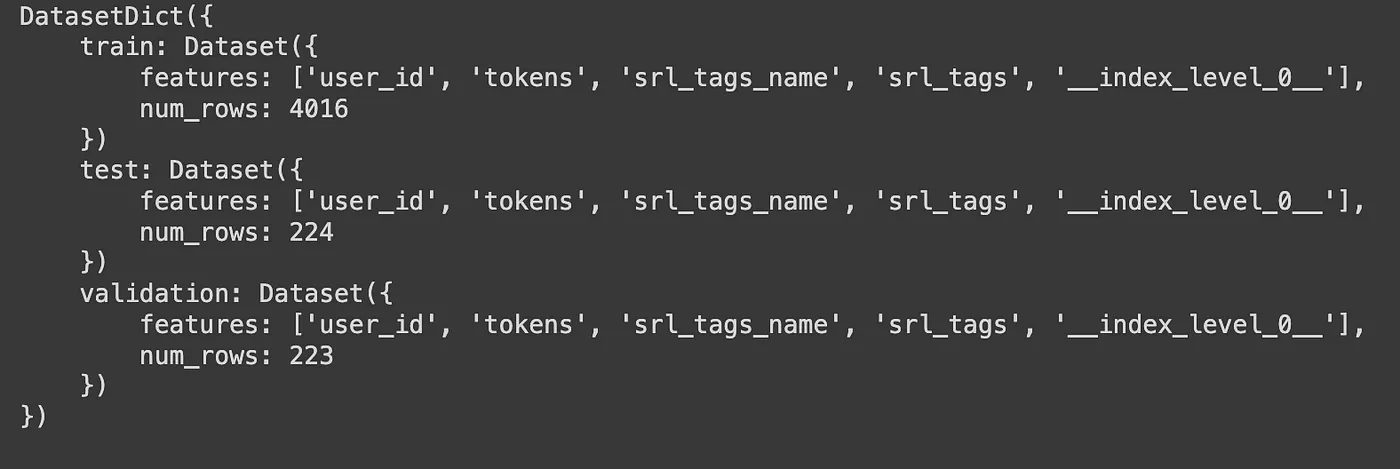
# SPLITTING main dataset into train, validation, test as DatasetDict
train_testvalid = dataset.train_test_split(test_size=0.1)
# Split the 10% test + valid in half test, half valid
test_valid = train_testvalid[’test’].train_test_split(test_size=0.5)
# Collect the two into a single DatasetDict
datasets = DatasetDict({
’train’: train_testvalid[’train’],
’test’: test_valid[’test’],
‘validation’: test_valid[’train’]})
👉 Step 2. Tokenization
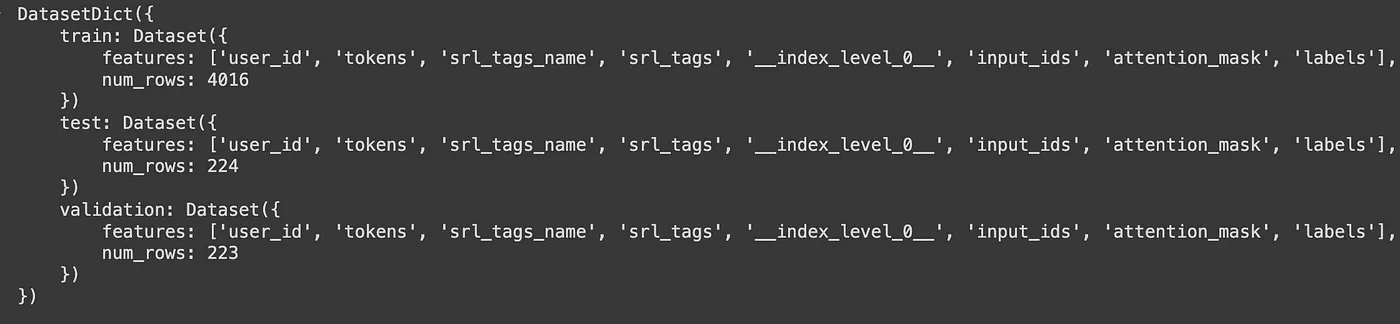
To tokenize our dataset in one step, we will use use robbert-v2-dutch-base Tokenizer (because I am using the Dutch legal text to finetune the a Dutch Bert-based model). The [datasets.map](https://huggingface.co/docs/datasets/process#map) method will apply a tokenization over the entire dataset:
tokenizer = AutoTokenizer.from_pretrained(“pdelobelle/robbert-v2-dutch-base”, add_prefix_space=True)
def tokenize_and_align_labels(examples, label_all_tokens = True):
tokenized_inputs = tokenizer(examples[“tokens”], truncation=True, is_split_into_words=True)
tokenized_datasets = datasets.map(tokenize_and_align_labels, batched=True)
After tokenizing the dataset, we now get also the ‘input_ids’ and ‘attention_mask’:
👉 Step 3. Finetuning with Huggingface Trainer
Load Trainer
Transformers provides a Trainer class optimized for training Huggingface Transformers models. We will start by loading the chosen model. I will be using the Dutch Bert model:
model = AutoModelForTokenClassification.from_pretrained(“GroNLP/bert-base-dutch-cased”, num_labels=len(label_list))
Create training hyperparameters
Next, create a TrainingArguments class which contains the hyperparameters you can tune:
batch_size = 1
args = TrainingArguments(
output_dir=".",
evaluation_strategy = “epoch”,
learning_rate=5e-5,
num_train_epochs=5,
weight_decay=0.01,
seed=1
)
Define the evaluation metrics
The datasets package also provides methods for producing accuracy metrics:
from datasets import load_metric
metric = load_metric(“seqeval”)
def compute_metrics(p):
predictions, labels = p
predictions = np.argmax(predictions, axis=2)
true_predictions = [
[label_list[p] for (p, l) in zip(prediction, label) if l != -100]
for prediction, label in zip(predictions, labels)
]
true_labels = [
[label_list[l] for (p, l) in zip(prediction, label) if l != -100]
for prediction, label in zip(predictions, labels)
]
results = metric.compute(predictions=true_predictions, references=true_labels)
return {
“precision”: results[“overall_precision”],
“recall”: results[“overall_recall”],
“f1”: results[“overall_f1”],
“accuracy”: results[“overall_accuracy”],
}
Finetune the model
Create a Trainer object with the chosen model, training arguments, training and test datasets, and evaluation metrics :
trainer = Trainer(
model=model,
args=args,
train_dataset=reloaded_encoded_dataset[“train”],
eval_dataset=reloaded_encoded_dataset[“validation”],
data_collator=data_collator,
tokenizer=tokenizer,
compute_metrics=compute_metrics
)
Then, we can simply fine-tune the model by calling train() method:
trainer.trains()
The model is done training and can be used on the Semantic Role Labelling task. Let’s check to see whether the performance is better than the pre-trained Robbert model:

Well, seems like the improvement is not that significant 😃 But at least, we learnt to fine-tune a Bert model!
>» Resources
Project 5: Model Evaluation
Evaluating the output of GenAI models is as crucial as it is challenging.
Back in the day before the GenAI time, you simply split your data into training/test/validation sets — train your model on the training set and evaluate performance on the validation and test set. In supervised learning, we use R-squared, Precision, recall, or F-sore to evaluate performance. How is a Large Language Model evaluated? What is the ground truth when it comes to generating new texts?
>» What will you create?
Apply different approaches to evaluate open-ended responses, including functional correctness, similarity scores, and AI-as-a-judge.
>» Skills you will learn
- Similarity Measurements Against Reference Data
- Checking the consistency of model output
- Using LLM as a judge
- Understanding evaluation metrics for NLP models (e.g., BLEU, ROUGE)
>» Fundamental theories
👉 Similarity Measurements Against Reference Data
One common approach is to evaluate AI’s outputs against reference data. Generated responses more similar to the reference responses are better.
There are three ways to measure the similarity between two open-ended texts:
(1)Asking an evaluator to make the judgment whether two texts are the same
Evaluators used to compare two responses can be human or AI. However, if you are already using humans to make this comparison, you might not need reference data — humans can evaluate the generated responses directly.
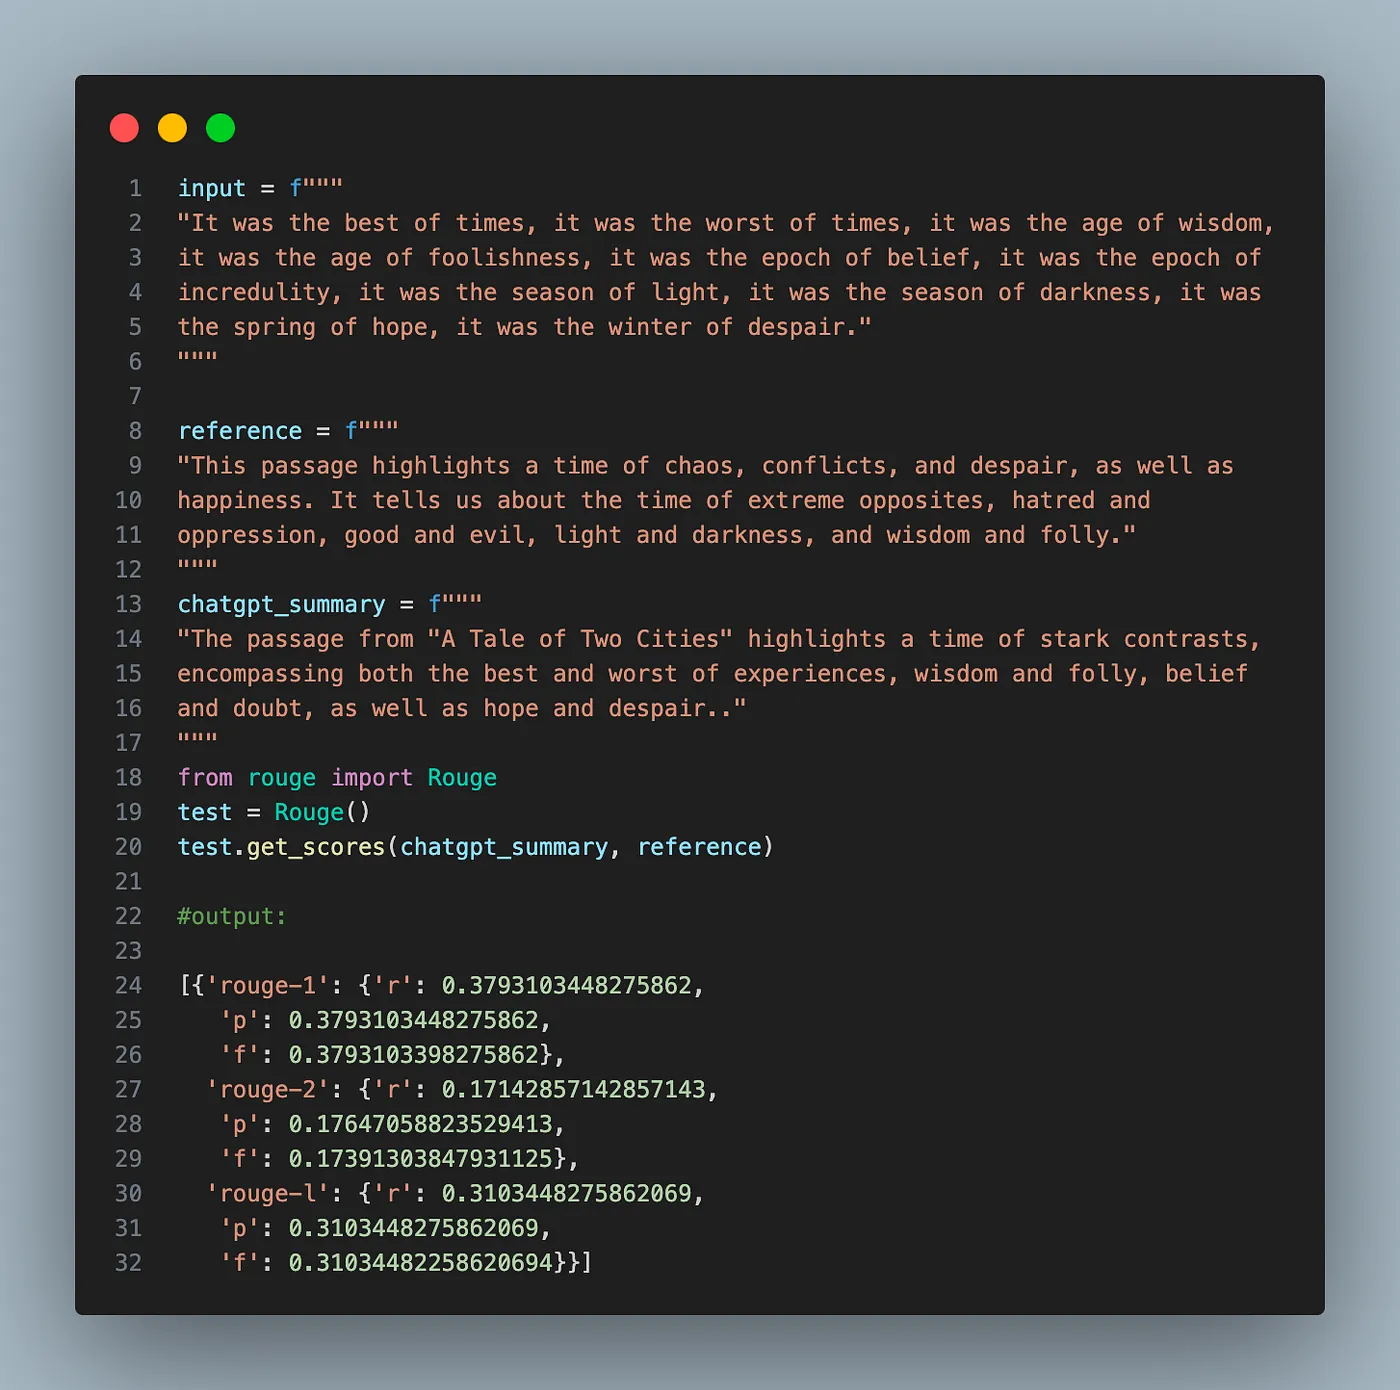
(2) Lexical similarity
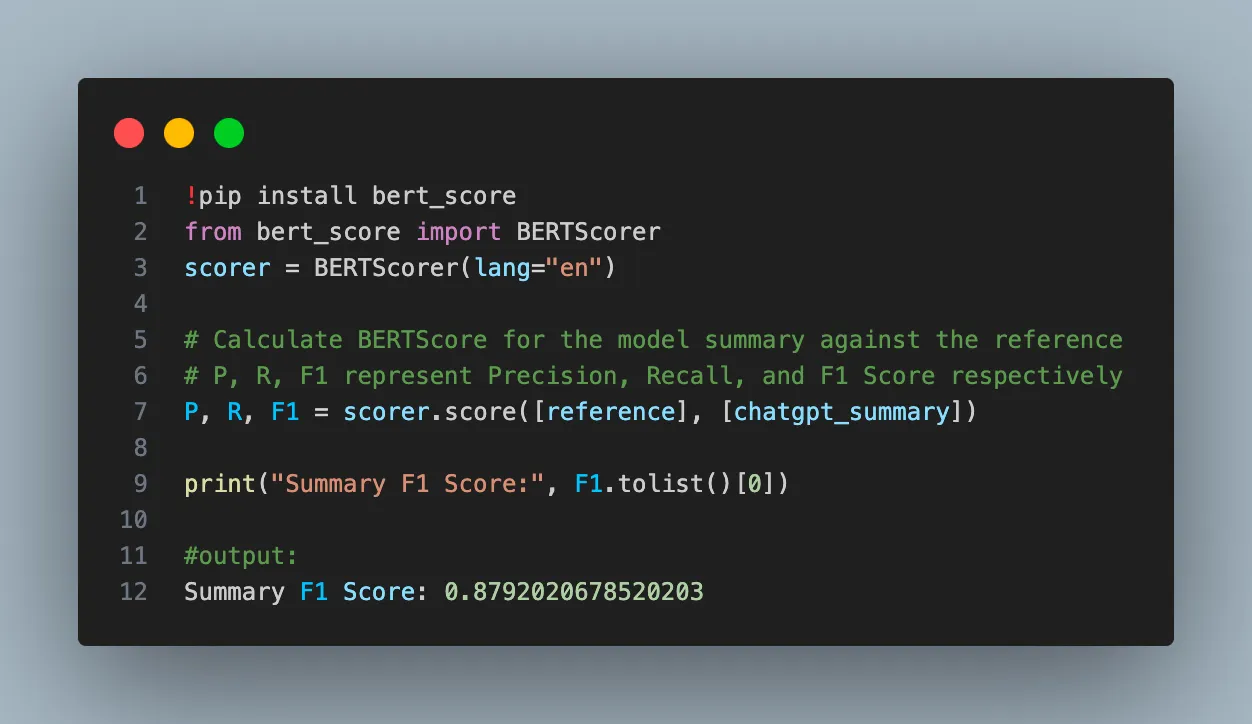
Lexical similarity measures whether two texts look similar, not whether they have the same meaning. In other words, this measures how much two texts overlap. One example of such a metric is the ROUGE score as in the following example:
(3) Semantic similarity
Semantic similarity measures how close the generated response is to the reference responses in meaning (semantics). This requires transforming a text into a numerical representation or embedding, that we have mentioned in projects 1 and 2.
👉 Checking consistency of model output
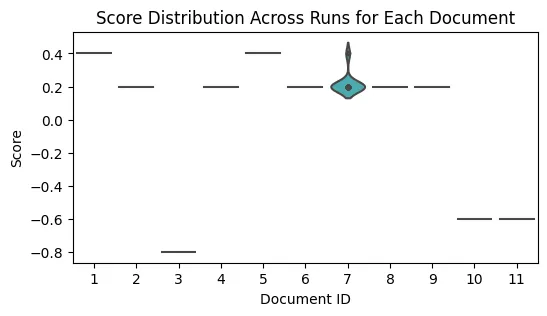
One big problem of LLM is reproducability. Chat Completions are non-deterministic by default, even at temperature = 0, which means model outputs may differ from request to request.
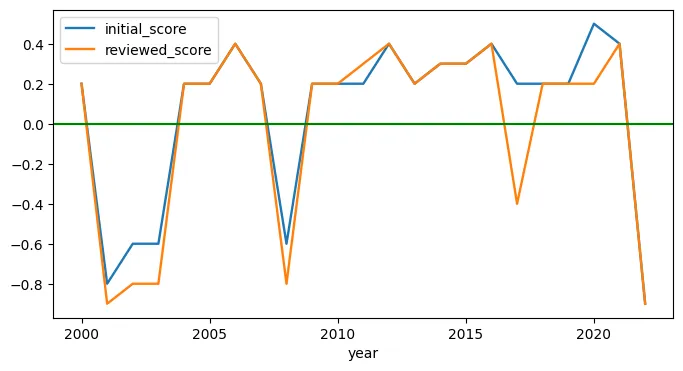
To evaluate the consistency of the model’s responses, we can repeatedly call the model with the same question and prompt, using different seeds each time. By analyzing how the answers are distributed across these runs, we can determine the model’s consistency. If the distribution of responses is narrow, it indicates that the model produces consistent outputs.
👉 Using LLM as a judge
As AI has successfully been used to automate many challenging tasks, can AI automate evaluation as well? The approach of using AI to evaluate AI is called AI-as-a-judge or LLM-as-a-judge. An AI model that is used to evaluate other AI models is called an AI judge
>» Implementation Steps
All the code can be found in one of my previous post.
>» Resources
📹 OpenAI Cookbook — Example for evaluation
Conclusion
So there you have it — five exciting projects to kickstart your journey into generative AI. I hope you found some ideas for your next AI projects.
We are still at the very early days of GenAI and we don’t know how things will turn out. Your next idea could be the one that changes the game. So keep experimenting, keep learning, and most importantly, keep having fun with it.
Any feedback or recommendation is greatly appreciated. Happy learning 📚😊!
Thanks for reading!
If you are keen on reading more of my writing but can’t choose which one, no worries, I have picked one for you:
GenAI’s products: Move fast and fail
_Building a cool and fancy demo is easy, building a final product is not._pub.towardsai.net
Do You Understand Me? Human and Machine Intelligence
_Can we ever understand human intelligence and make computers intelligent in the same way?_pub.towardsai.net